Tuesday, May 24, 2011

Day 22 – Gardening

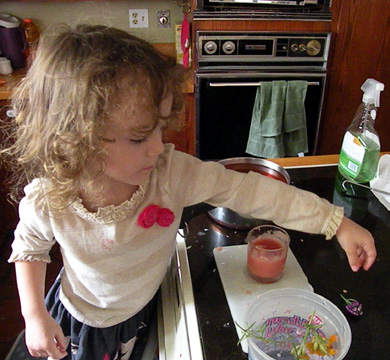
Today LeeAnn and I worked in the Garden together. Over the weekend we had purchased several plants and I wanted her to help me plant them.


LeeAnn has been especially enamored of flowers this year and we have let her pick out quite a few plants, but my father is our home gardener, so we haven’t yet planted any together. Today we planted a pair of Easter lilies, a basil plant, some pink petunias and an azalea bush. My little girly girl even overcame her dislike of being dirty and helped me with every step.


Gardening is a great activity for our little ones. Not only does it get them outside, but they see and learn so much about plant life. Even if you live in an apartment you can set up a small container garden with your child.


With the introduction of the brown mamorated stink bug from Asia has pretty much ended my vegetable garden this year; however some plants do seem impervious to this nefarious pest. My sage, rosemary and marigold plants have all been left alone. These plants can even protect your vegetable plants if planted together. It seems the stink bugs avoid these plants.


How to Make a Container Garden
Supplies:
A large pot or half barrel
Potting Soil
Plants of different varieties. (For most containers it is important to choose small, short plants. The tag usually has such information. You also need to consider sunlight availability when choosing plants.)
Watering can
Trowel

Instructions:
-          Put a layer of potting soil in the bottom 2/3 of the pot. This gives you enough soil to dig shallow spots in when setting up the plants for placement.
-          Plan out how you each plant placed. Keep in mind height and width of each plant when considering layout.
-          Remove each plant from its container. Make sure you loosen the root ball to allow the roots to spread into the surrounding soil. If the root ball is severely matted, you may need to cut some of the roots away to loosen them.


-          Use the remaining potting soil to fill in the spaces around the plants.
-          Water them until saturated, make sure to keep them moist until the roots take hold and then water as needed.


Monday, May 23, 2011

Day 21 – Cave Hand Prints

Ever since we did the hand prints in dough, I have been drawn to the Chauvet Cave handprint. So I decided we would try to make our own.


This cave was discovered by hikers in 1994 in France. Most of the images found in the cave date back to 30-32,000 BP. These extensive artworks include several partial handprints and hand stencils[1]. From the pictures I’ve seen of the work, the cave is closed to the public, it appears as if the artists are leaving their marks with the hand stencils.


LeeAnn and I had picked up some slate roofing tiles last time we were at my Grandfathers house. We choose to use these for our prints, but any material will work. We first experimented with blowing and rubbing pastel chalk dust around our hands to make the stencils. Though this worked some what, I did not get the definition I was looking for. Next we used pastel crayons to trace around our hands. After showing her how to do this on one slate, I let her trace her own hand. Since this was a new idea, LeeAnn really enjoyed it, but did not create perfect prints. Her work instead created beautiful abstracts. We ended up working on both sides of every slate she enjoyed it so much.


I kept two pieces by spraying them with matte clear coat to preserve the images and cleaned off the rest of the pieces. LeeAnn however has continued creating hand stencils on her chalk board in the house.


How to Make Cave Hand Prints
Supplies:
A hard surface (I used slate, you can use anything though)
Pastel Crayons
Matt Clear Coat

Instructions:
 - Using the pastels, trace you hand with different colors, using your fingers, blend the colors around the shape of your hand.


 - If you want to keep them intact, spray a few coats of matte clear coat over the print.


[1] http://www.metmuseum.org/toah/hd/chav/hd_chav.htm

Day 20 – Paper Batiking

I love the look of batik fabric, but when I heard about this technique, I admit I was skeptical. But hey, when you’re doing 365 different craft projects you need to be willing to try new things.

Evidence of Batiking has been found as far back as the Sui Dynasty in 581 AD China. Its wide spread use is probably the result of trading thought Asia and the middle east. Of course, it was the Germans who first created mass produced batik fabrics[1].

LeeAnn and I began by using crayons to color on a page of construction paper. I had to keep asking her to draw more and press harder. She seems to have reached a stage in her work where shapes are more important than pressure.

The paper crumpling was fun for her, so I let her crumple up my work as well. LeeAnn then was allowed to paint over both drawings which I then rinsed off and ironed. This project, though it worked, is definitely better for older children. Toddlers work is not consistent enough to work well with this technique.

How to Dry Flowers with Silica Beads
Supplies
Construction paper
Crayons
Tempera paints
A large paint brush
Water
An Iron
Newspaper

Instructions
-          On a sheet of construction paper, draw a picture with crayons using a heavy hand. The crayon drawing should be dark!


-          Crumple up the sheet of paper into a tight ball and gently unfold and flatten. Notice the cracks in the paper and drawing!
-          Using a contrasting color, paint the entire sheet over with tempera paint.
-          Gently rinse the paint of under running water.
-          Using a hot iron, cover the drawing with newspaper and iron the drawing until dry.


[1] http://www.batikguild.org.uk/history.asp

Day 19 - Button Crayons

If your child is anything like mine, they like to peel off the crayon labels before using the crayons. The label however is what gives the crayons their stability, so now they break at the drop of a hat. This leaves you with many, many broken bits of crayon lying around. Instead of throwing them out, you can recycle these bits of crayon into some beautiful mosaic crayon buttons.

Crayola of course is the first brand anyone thinks of when you mention crayons. They are easily the best on the market. Of course that is probably because they were the first kids crayons ever made. Originally crayons were a mixture of charcoal and oil. These crayons, while safe for industrial use, were too toxic for children. The Crayola brand exchanged charcoal for safe pigments and wax, creating the first brand of crayons exclusively for children[1].


We started this activity by sorting out the different colored crayon bits. I then presented her with the greased muffin tin and explained what I wanted her to do. Then I stood back and watched her go.

Once out of the oven and completely cool the crayons are easily removed. I was too impatient at first and my finger broke the cooled outer layer and sunk into the molten crayon beneath, Yuk. Once ready, they came out looking really beautiful. Your child can experiment with the different edges while coloring with them. LeeAnn liked using the flat bottom to create wide swathes of color and turning the button several times on the paper to make darker circles of color.

How to Make a Fish Mobile
Supplies Needed
Broken Crayons
Mini muffin tin
Pam
Oven
Divided tray or containers

Directions (just suggestions, really its up to you)
-          You and your child sort the broken bits of crayon by color.
-          Spray the muffin tin with Pam and place it before your child.


-          Have the child fill each muffin cup with different bits of crayon. There is no wrong way to do this so let the child go crazy.


-          Put the pan in an oven, preheated to 400°. Let sit for up to 2-3 minutes, or until the crayons are completely melted.


-          Remove from the oven and allow to COMPLETELY cool. Remove from pan and vola, coloring buttons.


[1] http://inventors.about.com/od/cstartinventions/a/crayons.htm

Day 18: Building with Blocks

Not every craft needs to be done with glue and crayons. For example, today we used a simple child’s toy to build and create wild feats of architecture; Duplo Blocks.

Lego is actually a combination of two Danish words, LEg and GOdt which means ‘play well’. They currently produce 2,400 different types of blocks[1]. One such product is the Duplo blocks line. These Legos are larger, perfectly designed for little hands and young imaginations. You can also buy several other brands of toddler blocks, such as, mega blocks and little people building sets.


LeeAnn loves to build with almost any type of block. She has wooden, foam, Lego and Lincoln logs.  With them she builds large towers, animals, castles, farms, and long curving paths.

Today we pulled out her largest set of Duplo blocks and went to town. This activity allows you to create a temporary formation of astounding beauty. We built several towers before creating one she really liked. We then made two block cars that traveled to and from the castle for an hour.


The best part about these creations is they come apart and can be used again. Anything that can be used multiple times and is easy to clean up makes the top of my list of cool toys!

So today, play with one of your child’s toy sets too, Bring in other toys as well to add to the fun. We’ve built around her train set and let her dolls live in the castles. These games help to strengthen your child’s imagination and can often inspire amazing works of art.


[1] http://parents.lego.com/en-gb/LEGOAndSociety/50th%20Birthday.aspx

Monday, May 2, 2011

Day 17 - Botanical Garden and Drying Flowers

Spring, my favorite season of the year! I don’t handle heat so well and the cold snowy weather of winter usually keeps me locked inside, so now that the weather is nice and moderate, I love taking trips outside. This year LeeAnn is enthralled by all of the flowers in bloom. Therefore I decided to take her to the nearest botanical gardens and let her really appreciate the spring blooms. While there we picked up any fallen flowers to take home for our craft.


The use of herbs and the publication of manuals by herbalist motivated the founding of botanical gardens in Italy in the 1500s. They were places of learning and study for students of medicine who needed to know how to not only use the plants but grow them as well[1]. By the 1600’s there were botanical gardens throughout Europe.


We picked up my sister and her children on our way to Baltimore to visit the Howard Peters Rawlings Conservatory and Botanical Gardens in Baltimore[2] next to the Zoo. For those of you who live near by but haven’t gone, you should really check it out. It takes about an hour to go through and see everything, but it’s a lovely place to just sit and enjoy. They have plants from every where and it cost nothing to get in. They do accept donations, $5 is recommended.


The kids loved it. We had fun looking at the plants and hunting for fallen blossoms (WE PICKED NOTHING!). We fed the fish and talk to the artist that were painting in the orchid room. When LeeAnn and I got home we used Silica beads to dry are flowers. Now we have a lovely collection of dry flowers for future crafts!


This project was actually very short, but the collection process was the truly fun part. Even if you just go on a nature walk it is enjoyable. We used the flowers from the botanical garden as well as from our own garden. LeeAnn loves to pick flowers, and it’s nice to have blooms she can keep forever.


How to Dry Flowers with Silica Beads
Supplies
Silica Beads
Flowers
Glass Bowl
Microwave
Storage dish
Paper clip


Instructions
 - Fill glass bowl with shallow layer of silica beads.
 - Arrange flowers in bowl; pour over remaining silica to cover. Make sure flowers are positioned as you want them dried.
 - Follow directions on package to dry. Usually microwave for approximately 1 ½ to 2 mins and let silica cool completely. Carefully uncover the flowers and clean of clinging beads; I used the paper clip for this.
 - If not completely dry microwave for longer in 30 – 60 sec increments.


[1] http://www.britannica.com/EBchecked/topic/75020/botanical-garden/771/History
[2] http://www.baltimoreconservatory.org/

Thursday, April 28, 2011

Day 16 Letter Writing

Day 16 – Writing Letters

The other day while checking the mail LeeAnn asked excitedly if she had gotten anything. Not many people write to a three year old, but what if she writes to them? So today we are writing, and I use the term loosely, letters. The art of letter writing, or snail mail, has mostly been forgotten in this age of electronics, but for young children it is still magical and exciting.

I miss letters; there is an intimacy to them that you cannot get from any other form of communication. The history I find most moving and touching is always based on the letters left behind by those of the past, like the letter George Washington wrote to his niece (a good book to check out if you like history). It is a shame that the voice that would tell the most compelling stories are often left without a voice, such as slaves, most nomadic tribes and pre-modern man.

Anyway, for LeeAnn’s letters, I brought out my collection of unused stationary (although I love letters, my handwriting is awful so I don’t write them often). I helped her choose paper for each addressee and write their name at the top of each page. She was then allowed to color a picture on each page. We tried to use the recipient’s favorite color, and we talked about that person while she colored. I asked what she wanted to say to them and wrote a few lines, making sure we did not write on the picture and helped her sign her name. We then chose a sticker or two that fit each individual’s personality and put it on the page. Finally LeeAnn folded the paper, sometimes she needed some guidance, and we put it in an addressed envelope. She put on the stamps and threw them in the box. I’ve warned my sister to make sure her cousins send some mail back.


This was a fun project for her. We got to practice our letters and work on her communication skills while ‘writing’ the letters, as well as use up some of my lonely stationary. In a little while, when LeeAnn ask if she got any mail today, I can hand her a letter too!

Wednesday, April 27, 2011

Day 15 – Hand Prints

This classic craft is always something nice keepsake for parents to hold onto. We made the classic version today, but I am also including directions for an updated version I have made for my family when LeeAnn was younger.

In Chauvet Cave in Southern France, a simple cave painting made 32,000 years ago helps to connect us to our human ancestors across time. It is done with the simple outline of a hand print.

With Mothers day coming up LeeAnn and I made three hand prints, one for us to keep, one for granny and one for Aunt Lab. After making bright pink dough I let LeeAnn make the handprints herself, because the dough does not harden until you bake it so it was very simple to re-roll it and let her try again. We then baked it and wrote her name and age on the back.

This is an instant keepsake, for an added special touch, take a nice picture of your little one and buy a shadow box frame, mount the picture with the print and you’ll have lovely keep sake you can hang on the wall. I have also included a more contemporary version of this project that I did with LeeAnn last year using a double paned frame and a stamp pad.

How to Make a Clay Handprint Keepsake and a Glass Ink Handprint
Supplies:
1 cup Flour
¼ cup Salt
1/3 cup Water
Food Coloring
Measuring Cups (liquid and dry)
Measuring Spoons
Rolling Pin
Baking Sheet
Cooling Rack
Permanent Marker

Ink Pad (non-Toxic)
Double Paned Shadow Box Frame
Childs Art Work

Instructions:
-          Mix together flour and salt, add food coloring to water if desired and add to flour mixture. Stir together. If the mixture is still dry and crumbly add a small amount of water. Mix until smooth.
-          Roll out and/or mold into shape desired, make sure it is no more than 1 ½ inches thick.
-          Have child press hand print into the surface while it is on the backing sheet as the handprint can be distorted as you try to move it.
-          Bake at 300°F for 30 – 60 mins. Do not let brown.
-          Once cool, write name, date and age on the back.

For contemporary handprint project, mount the child’s picture on the back of the shadow box. On the middle frame of glass, have the child put his handprint using the nontoxic ink pad. This makes a very unique looking handprint that you can share with the rest of you family.

Day 14 - Wax Play

I didn’t really have a plan for today; we were just supposed to make something that floats. Immediately everyone I know said, make a boat, but who wants to be like everyone else. Not me! Finally I decided to soften up some wax (it floats) and see what we come up with.

Modern candles are made with paraffin wax, yet another fine product we use crude oil to make. Its not just gasoline[1]! Luckily, this is a byproduct of gasoline production, so it does not call for extra consumption. Alternative waxes can be found in bees wax and the candelilla plant[2] which has a very interesting history. Please check the link below to find out more.

LeeAnn and I really just played with the wax today so there is really no how to. We started by making wax fingers and hands. I started the day out by taking to glade candles and melting them in a pot of water. I kept in the candle holder and melted completely. To the other I add extra candle wax and pink coloring.

Next I let the wax cool a bit until LeeAnn and I could touch it. (I did try to mold the soft clay. But I was the wrong type and crumpled, often becoming cool to quickly). We began simply by putting our fingers in the wax; LeeAnn made one wax finger that she let me keep, and re-melted the others in the large pot that never quite got cool. I was able to make a set of fingers and an entire hand.

After that we went outside into the garden and picked several flowers. Once back inside I let LeeAnn dip them into the hot wax and drop them into a water bucket. If we shook off the excess wax, they turned out very nice and preserved the flower quite well.

Finally I let LeeAnn make a candle. By using one of the old wicks and a ruler, she was able to dip the wick into the hot wax and then dip it into the cool water. By alternately dipping the wick in this manner she was able to make two small drip candles.

Clean up was a nightmare though. If you want to explore any of these crafts further I suggest dedicated tools, so the cleaning does not have to be a thorough. It took a long time to get every bit of wax off of the pots and utensils!


[1] http://www.candlewaxmaking.com/history-of-candlemaking/
[2] http://www.texasbeyondhistory.net/waxcamps/history.html

Day 13 – Clothes Pin Dolls

Today I wanted to make something that took me back to my childhood. As a kid we had these Christmas tree ornaments that my father had made out of clothes pins. Little figures, sailors, wiremen, kings, queens, and other dolls with tiny detailed faces looking down at me from the tree; I loved them. Then other day while at the book store I found a kit for kids to make an easier version, so I thought why not.

Once again these are credited German invention, did all the toys come from there? But clothes pin dolls are a folk toy that children made I’m sure long before the Germans marketed them. 

Our theme for our dolls was near and dear to LeeAnn’s heart, fairies and princesses. We began by picking out our pins and gluing on the sticker faces provided. This is much easier for a young child to do than painting the small face as is traditional. We only worked on three pins; I saved the other five for when I have time to paint them.  From there things got rather boring for LeeAnn. The Clothing was difficult, the kit did provide paper clothes, none of which LeeAnn or I, the perfectionist, liked. So I made our own (she watched). Next LeeAnn picked out the Hair, which I hot glued on. Then she picked out the wings and decorations, which I hot glued on. Then we played with them.

This is a better project for older children. I kind of knew it would be, but as I said nostalgia hit me and I wanted to give it a try.

How to Make Clothes Pin Dolls
Supplies:
Clothes Pins
Paints
Fine Paint Brushes
Yarn or Fuzz
Fabric
Fabric Flowers
Small Buttons or Gems
Hot glue gun

Instructions:
-          Start by painting the face with the fine paint brush.
-          Next glue on you clothing. I found it easiest to cut out the clothing, try it on, and then glue it. (Silk flower petals make great skirts)
-          Add Hair by gluing on either yarn or fuzz to the top of the head. (Our princess has an awake face on one side and an asleep face on the other so her hair is only on top.)
-          Finally add final touches, like jewelry, belts and shoes. Shoes are traditionally done by wrapping yarn around the end of the clothes pin.

Day 12 – Snow Globes and Lava Jars

Here is a quick and satisfying craft you can do with your children. It took about 5 minutes and the kids played with them the rest of the morning. We had a hectic schedule today, so I wanted to choose a quick craft we could do after breakfast. I also wanted to make sure my niece got to take something home with her that would remind her of her week here.

Snow globes were late comers to the American scene, remaining a primarily German art through the 1920s. It was the Americanization of the Snow globe in the 1940s that lead to the plastic, cheap, tacky snow globe you can find in every road side tourist shop around the world today[1].

Lava lamps were perfected by Craven Walker who saw a lamp in a pub after WWII made from “an old cocktail shaker, old tins and things.” He spent years working it out and eventually came out with the lava lamp, just in time for the psychedelic movement. It’s a good thing too, because before that everyone else thought they were weird and gross.

I actually began this project the night before. I knew I would be in a hurry, so I picked out to McDonald’s happy meal toys that fit in the jars and hot glued them to the inside of the jar lids. The next morning after breakfast we sat down at the table and the girls made the lava globes first. They filled their jars half full with baby oil and chose a food color. I use gel in my house but the drops work great and your child can put that in themselves. Then they poured water in. Color magically appears in the water as it flows into the jar. It’s pretty cool to see. Run some rubber cement along the empty lid and screw on the top.

Then they made the Snow globes. First the girls poured the cups a third full of light corn syrup; this makes the glitter settle slowly when you shake the globe. We then added glitter, beads and waters. I added the lid with the toy and added more water as needed. Swiped the lid with glue, secured the top and finished.

These make a great activity and an inexpensive take home gift for parties! They also help you do something with all those useless happy meal toys that are so much garbage fodder. I know I shouldn’t let her eat at those places at all, but sometimes when we are really busy, it’s a better option that eating nothing.

How to Make Snow Globes and Lava Jars
Supplies:
Canning Jars (Wal-Mart Sells Smooth Sided Ones)
Baby Oil
Light Corn Syrup
Water
Glitter
Beads
Toys
Food Coloring
Hot Glue
Rubber Cement

Instructions:
Lava Jars
 - Fill Each Jar Half Full with Baby Oil
 - Add 3-4 drops of food coloring
 - Add water until jar is full. Screw on cap and lightly shake jar to mix food coloring, if too light add more coloring.
 - Unscrew lid and swipe inside screw top with rubber cement. Re-secure lid.
Snow globe
 - Hot Glue Toy onto the inside of the lid after you make sure it fits inside the jar. For some toys you may need to add a stand so it can be seen above the lip of the jar.
 - Fill the jar 1/3 full with light corn syrup. This will slow the glitter and keep it from settling to quickly when the jar is shaken.
 - Add some glitter and or beads or confetti.
 - Add water to fill the jar
 - Put the inside lid on the top of the jar and add more water if required.
 - Swipe the inside screw ridges of the lid with rubber cement and secure lid on the jar.
 - Shake up jar to mix the water and the corn syrup.


[1] http://www.ehow.com/about_6573582_history-snow-globe.html